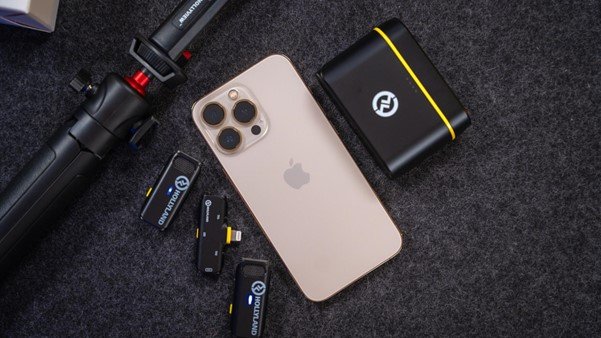
It seems like every day, more and more people are using their iPhones to record videos without Lavalier Microphone. Whether it’s for a school project, a work presentation, or just to capture a family moment, the ability to record high-quality video right on your phone is incredibly useful. But if you want to be able to use a lavalier microphone with your iPhone, you may not know where to start.
In this guide, we’ll walk you through the process of connecting a lapel mic to an iPhone. By following these steps, you’ll be able to get the most out of your lavalier mic and iPhone combo. Let’s get started!
What Is a Lavalier Microphone?
Before we get into the process of connecting a lavalier mic to your iPhone, it’s important to understand what a lavalier microphone is. A lavalier mic, also known as a lapel mic or an “on-camera” mic, is a type of small microphone that can be clipped onto clothing and used for audio recording. Lavaliers are typically used in situations where a person needs to be able to record audio while not having the microphone directly in their hands, such as video recording or interviews.
Some Scenarios Lavalier Mics Are Used with iPhones
In addition to the general use cases mentioned above, lavalier mics can also be used in a variety of scenarios with an iPhone. Here are a few scenarios where using a lavalier microphone with your iPhone might come in handy:
- Interviews—If you’re looking to record a professional-sounding interview on your iPhone, then using a lavalier microphone will definitely help. Your iPhone’s built-in mic can’t compare to the sound quality of a lavalier microphone.
- Music recording—A lavalier wireless microphone makes it much easier to capture high-quality audio recordings for musical instruments or vocal performances on your iPhone. In addition, lavalier mics are also much more portable than regular microphones, making them ideal for recording music on the go.
- Vlogging—If you’re looking to take your vlogging game up a notch, then using a lavalier mic is definitely the way to go. Vloggers often need to be able to move around while recording and a lavalier mic makes it easy to do so without sacrificing sound quality.
- Podcasting—Podcasts often require multiple people to be recorded at once, making them the perfect candidate for a lavalier microphone setup. With lavaliers, you can get much more consistent audio quality without having to constantly adjust the mic placement.
- Live streaming—If you’re streaming video from your iPhone, using a clip mic can help ensure that your audio is always crystal clear. Lavaliers make it easier to maintain quality sound even when you’re moving around or speaking in different directions.
- Public speaking—Whether you are presenting at a conference or giving a speech in class, having a lavalier microphone can make it much easier to ensure that everyone can hear you. With a good quality lavalier mic and your iPhone, you’ll be able to get clear audio for any public speaking scenario.
- Home video recording—Lavaliers are great for any type of home video recording. Whether you’re filming a family reunion or just capturing everyday moments, having a lavalier microphone can give your home videos an extra layer of professionalism and clarity.
How to Connect a Lavalier Microphone to Your iPhone
Now that we understand why lavaliers are so useful with iPhones. Let’s look at the process for connecting one to your device.
Step One: Invest in a Quality Lavalier Microphone
First, you’ll want to make sure that you are investing in a quality lavalier microphone. While there are plenty of budget options out there, it’s important to remember that the sound quality of your recordings will depend heavily on the quality of the mic itself. Look for mics with good reviews and a reputation for clear sound.
Lark M1 is such a lavalier microphone for iOS with great sound and build quality. Having both a mini-XLR and 3.5mm jack, the Lark M1 is compatible with almost any recording device out there including iPhones. And with its omnidirectional polar pattern, the Lark M1 captures sound from all directions which makes it perfect for recording in noisy environments. Furthermore, the Lark M1 is incredibly small and lightweight, making it perfect for recording on the go.
Step Two: Get an Adapter
In order to connect your lavalier microphone to your iPhone, you’ll need an adapter. Most lavaliers use a 3.5mm jack, so make sure that the adapter you purchase is compatible with this type of plug. You can find adapters at any electronics store or online.
Step Three: Connect the Adapter to Your iPhone
Once you have your adapter, simply plug it into your iPhone. This will enable you to connect the lavalier microphone directly to your device. Your iPhone must be using iOS 11 or later in order to use this type of connection.
Step Four: Connect the Microphone
Now that the adapter is connected, you can plug in your lavalier microphone. Just insert the 3.5mm plug into the adapter and you’re good to go!
Step Five: Start Recording
Now that your lavalier microphone is connected to your iPhone, you can start recording right away. Use your favorite audio recording app and start capturing great sound with your new mic!
Conclusion
Once you have a quality lavalier microphone for the iPhone, connecting it to your iPhone is a simple and straightforward process. With the right adapter, you’ll be able to plug in your lavalier microphone and start recording great sound in no time.
Whether you’re making music, vlogging, podcasting, live streaming, or public speaking—connecting a lavalier microphone to an iPhone will give you the sound quality that you need for any project. So, get out there and start capturing audio with your lavalier mic!
The Holy Land Lark M1 really brings out the best in your sound. Check it out and enjoy recording with high-quality audio! Most importantly, don’t forget to have fun while you do it!


